DFD6760Fully Automatic Dicing Saw
High end dicing saw for Φ300 mm wafers
- Φ300 mm
- Facing dual spindle
Fully automatic dicing saw with dual chuck tables
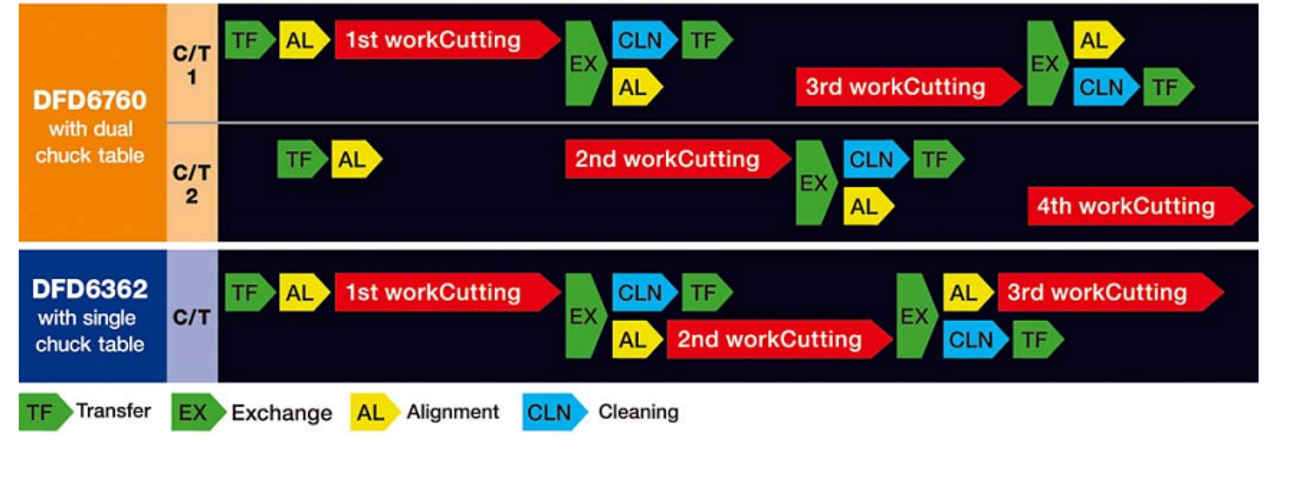
DFD6760 is a high end model which has further enhanced productivity from the existing model, DFD6362. Since this dicing saw has two chuck tables (hereafter called C/T), it is possible for transfer and alignment to occur on one chuck table, while processing is performed on the other chuck table. This shortens the spindle waiting time for processing considerably and improves productivity. In addition, inspection and measurement operations including processed workpiece image recording and workpiece thickness measurement using an NSD* can be performed on one chuck table, while processing proceeds on the other chuck table to maintain throughput. Increased X, Y and Z-axis feed speeds (same as the existing model) also contribute to the reduced processing time.
* Non-contact Surface Detector (option)

Enhancing the quality of thin wafer processing while maintaining throughput
For thin wafer step cuts, controlling the cut depth from the wafer surface is important. The NSD that is used to control the cut depth makes it possible to measure the wafer upper surface height very accurately. Typically, the NSD requires about 10 seconds to make the measurements, but in the case of the DFD6760, the NSD makes the measurements while processing the wafer on the other chuck table, so the throughput does not deteriorate.
Various measures to prevent particles
The cut section atomizing nozzle, wheel cover, and chuck table water curtain, which have been well received in the DFD6362, are selectable as optional accessories in accordance with workpiece characteristics.
Meeting the need for traceability
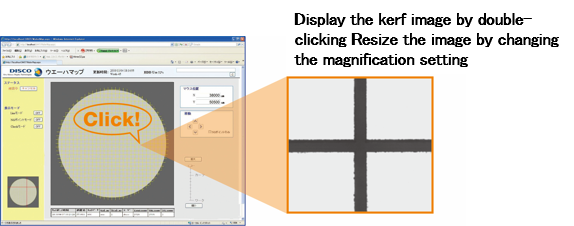
Since the DFD6760 is equipped with two chuck tables, while dicing is performed on one chuck table, kerf images of the workpiece after processing can be saved and processing quality can be recorded using the other chuck table. In recent years at production facilities, there has been a demand for traceability. If a defect is found in a device, the DFD6760 can provide the records to check or certify product quality.
Easy operation
The GUI (Graphical User Interface) implemented on the DFD6362, which has been recognized for its ease of use, has been included on the DFD6760. This is combined with an LCD touch panel for stress-free operation.
Dicer image viewer and software for browsing processing records

Process flow comparison with existing model

Specifications
| Specification | Unit | 1.2, 1.8 kW | 2.2 kW | |
|---|---|---|---|---|
| Max. workpiece size | mm | Φ300 | ||
| X-axis | Cutting range | mm | 310 | |
| Cutting speed | mm/s | 0.1 ~ 1,000 | ||
| Y1・Y2-axis | Cutting range | mm | 310 | |
| Index step | mm | 0.0001 | ||
| Positioning accuracy | mm | Within 0.003/310 (Single error) Within 0.002/5 |
||
| MY1・MY2-axis | Index step | mm | 0.0001 | |
| Positioning accuracy | mm | Within 0.003/310 (Single error) Within 0.002/5 |
||
| Z-axis | Max. stroke | mm | 14.7 (For Φ2 inch blade) | 14.9 (For Φ3 inch blade) |
| Moving resolution | mm | 0.00005 | ||
| Repeatability accuracy | mm | 0.001 | ||
| θ-axis | Max. rotating angle | deg | 380 | |
| Spindle | Rated torque | N・m | 0.19(1.2 kW/High-speed rotation) 0.29(1.8 kW) |
0.7 |
| Rotation speed range | min‐1 | 6,000 ~ 60,000(1.2 kW/1.8 kW) 20,000 ~ 80,000(High-speed rotation) |
3,000 ~ 30,000 | |
| Equipment dimensions(W×D×H) | mm | 1,200 × 1,900 × 1,800 | ||
| Equipment weight | kg | Approx. 2,750 | ||
*Product appearance, features, specifications, and other details may change due to technical
modifications.
*Please read the standard specification sheet thoroughly before use.
Product Lineup
| Machine type |
| Spindle |
| C/T |
| Machine dimentions(W × D × H) |
| Machine weight(kg) |
DFD6760Fully Automatic Dicing Saw
Contact
Please feel free to contact us with any questions or inquiries.


